Monday, December 26, 2016

DIY Project–How to Make Blue Beaded Drop Earrings with Seed Beads

Today Im going to introduce this pair of blue beaded drop dangle earrings to you. If you happen to be looking for some simple diy projects, you should not miss this one. Many people loves to make seed beads jewelries, because they are generally simpler to be made but they still look nice and chic.
Before starting to make this pair of blue beaded earrings, the following materials must be prepared:
2MM White Round Seed Beads
2MM Blue Round Seed Beads
4MM Black Round Seed Beads
4MM Silver Round Spacer Beads
5MM Flower Bead Spacers
Silver Jump Rings
Silver Tiger Tail Wire
Flat Nose Pliers
Scissor
Then, follow these steps to make the drop dangle earrings.
Step 1: cut off a piece of silver tiger tail wire, and cross it through all the elements suggested in the first picture orderly.
Step 2: cross the wire back the jump ring and the next four beads. Slide 12 beads onto the wire like the picture shows.
Step 3: cross the wire back the black seed bead.
Step 4: slide other 21 beads onto the wire like picture shows. Then cross the wire back the black seed bead to make a small loop with these beads.
Step 5: slide five beads onto the wire, then cross the wire through one black seed bead. Then slide other five beads onto the wire, and cross the wire through another black seed bead to form a pattern like the picture.
Step 6: slide five beads onto the wire and cross the wire through the four beads by the end.
Step 7: cross the wire through the jump ring and cross it back the next 10 beads.
Step 8: slide more beads onto the wire in order like the picture shows.
Step 9: cross the wire back the ten beads by the other end to form a big loop.
Step 10: attach an earring hook to the jump ring.
Step 11: make another earring in the same way.
This is the final look of the drop dangle earrings:
All jobs are done by now. This is a very simple diy project, isnt it? If you have got all the information, why not have a try on this pair of chic blue beaded drop dangle earrings? It will perfectly decorate your ears. Hope you like this tutorial, goodbye~


Tuesday, December 20, 2016

Tutorial on How to Make A Wire Wrapped Pearl Pendant Necklace

How do you like wire wrapped jewelries? Today, I’m going to share with you a simple design wire wrapped pearl pendant necklace. Wire wrapped jewelries are becoming more and more popular today, because wires can be combined and turned into any shape you imagined in your head. So one hundred people can give one hundred different designs when making wire wrapped jewelries.
Before making this wire wrapped pendant necklace, you need to prepare the following materials:
1.5mm Brown Aluminum Wire
6mm White Round Pearl Beads
0.5mm Brown Copper Wire
Antique Bronze Magnetic Clasps
Black Cord
Needle Nose Plier
Round Nose Plier
Diagonal Plier
Iron Scissor
Glue Gun
Then you can follow these steps to make the necklace:
Step 1: cut off one piece of 1.5mm brown aluminum wire and use a round nose plier to make it look the same as in the picture.
Step 2: wrap the 0.5mm brown copper wire on the aluminum wire like the picture shows.
Step 3: slide a 6mm white pearl bead onto the copper wire and then wrap the copper wire on the aluminum wire to fix the white pearl bead.
Step 4: according to step 3, fix more white pearl beads onto the wires.
Step 5: starting from the external end of the aluminum wire to wrap more copper wires.
Step 6: wrap the copper wire around the inner and the external aluminum wires.
Step 7: cut off a piece of black cord and attach a magnetic clasp to combine its two ends together.
Step 8: use the round nose plier to make a loop on a short piece of aluminum wire.
Step 9: cut off the small loop from the aluminum wire, and use it to link the pendant and the black cord.
Then it is finished. Quite easy, right? This is a picture of its final look.
Jewelries can reflect personality. The design of this necklace is simple and graceful. If you happen to admire this type of style, you should not miss it. And its color: white, black and gold, are considered as the most easy matching colors for clothes. So it’s fine for you to wear this wire wrapped pearl pendant necklace all the time. 


Wednesday, December 14, 2016

Beginners’ Easy DIY: A Pink Pearl Bead Bracelet

If you are an inexperienced handcraft learner, I recommend you to practice on this beautiful easy diy pink pearl bead bracelet. The design of this bracelet is very simple and organized. It does not incorporate complex procedures, so even beginners can have a try.
If you like this bracelet, you can follow this tutorial to learn how to make it.
Before starting to make this beautiful pink pearl beaded bracelet, we need to prepare these materials:
6MM Round Pink Glass Pearl Beads
2MM Round White Glass Seed Beads
Silver Jump Rings
Spring Ring Clasps
Transparent Fishing Wire
Flat Nose Pliers
Scissors
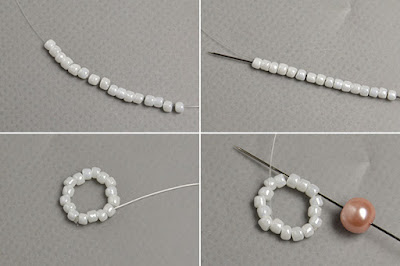
Step 1: use needle to slide 16 pieces of white glass seed beads onto the fishing wire, then thread the wire back these beads again to make a loop.
Step 2: make a knot on one end of the fishing wire, and cut off the extra, then tighten the wire.
Step 3: cross the wire through four beads and slide a pink glass bead onto the wire. Then cross the wire through three white beads which are on the opposite side.
Step 4: tighten the wire, and slide 13 white glass beads onto the wire, then cross the wire through those three white beads again to make another loop.
Step 5: imitate step 3 to fix another pink glass bead inside the loop.
Step 6: repeat the process until the length is suitable. Make another knot on this end of the wire and cut off extra wires.
Step 7: attach 2 jump rings to one end of the bracelet, and attach one jump ring and one spring ring clasp to another end.
Look how easy it is to make this beautiful pink pearl bracelet!
With more practices on the techniques that have been used in making this bracelet, you will be able to diy more unique and chic jewelries. Or, you can also make as many changes as you like to this bracelet according to your preferences. Hope you like this tutorial, have a good day!


Friday, December 9, 2016

DIY Journal: How to Make A Rhinestone Christmas Tree

I believe you should never miss this simple diy rhinestone Christmas tree if you are both fans of Christmas Day and simple diy handcrafts. PS, this beaded Christmas tree is really not hard to make. By preparing a few cheap beads and then following the steps of this tutorial, you are capable to make one to decorate your house on Christmas Day. Now let’s see how it’s done! 
Before starting to make the rhinestone Christmas tree, we need to have the following jewelry making supplies:
10x6x5mm Flat Back Rhinestone Beads
Non Woven Polyester Embroidery Needle Felt
2mm Wide Rhinestone Cup Chain
Glue Gun
Scissors
Pliers
Tweezers
Then it takes other four simple steps to finish the tree.
Step 1: Make the main part of this Rhinestone Christmas tree
1st, draw a sketch of the tree on the felt;
2nd, use glue to stick a piece of rhinestone cup chain to the trunk of the tree, make sure the cup chain is in the same length with the tree trunk;
3rd, continue to stick more cup chains to the right side of the tree.
Step 2: Stick more rhinestone cup chains to complete the main tree pattern
1st, add more rhinestone cup chains to complete the right part of this Christmas tree;
2nd, finish the main tree pattern by adding rhinestone cup chains to the left part in the same way.

Step 3: Add more rhinestone beads to the Christmas tree
1st, glue a green flat back rhinestone bead to the bottom of the trunk like picture shows;
2nd, use glue to stick five red rhinestone beads together to form a flower pattern at the top of the Christmas tree.

Step 4: Finish the Christmas tree
Finally, carefully cut off extra felt around the Christmas tree.
It’s easy, right? I believe you are qualified to make one by yourself now. And you can adjust the size of the rhinestone Christmas tree according to your preference. Let’s appreciate the final look of the tree!
By the way, you can also hang it up on a stick. It will create much more festive atmosphere. And I wish you all a merry Christmas! Hope you have fun!


Thursday, December 8, 2016

DIY Christmas Hoop Earrings with Seed Beads and Glass Beads

Hi, everybody, hows it going this week? Christmas is around the corner, are you ready? Have you ever planned to make some Christmas jewelries for your friends or family members? Today I wanna share a DIY project on how to make Christmas beaded earrings with you. Hope you can enjoy it, lets check the details together.
What are you going to need for these Christmas seed bead earrings:
2mm Green Seed Beads
2mm Red Seed Beads
4mm Red Glass Beads
0.2mm Fishing Wire
Scissor
How to make this pair of Christmas beaded dangle earrings:
Step 1: cut about 80cm fishing wire and alternatively slide 14 red seed beads and 14 green seed beads to the wire as picture shows, next twist the beaded patterns to form a bead hoop, then continue to slide 2 green seed beads, 1 red seed bead and another 2 green seed beads in sequence to the wire, thirdly cross the wire through the nearby green seed bead to make a tiny flower pattern like picture shows, finally repeat the same ways to make more flower patterns.
Step 2: thread 2 green seed beads, 1 red glass bead and another 2 green seed beads in sequence to the wire, then connect this beaded pattern with the nearby flower pattern like picture shows, finally repeat the same ways to connect all the beaded patterns as picture shows.
Congratulations, This pair of Christmas dangle earrings have been finished!
Do you like these green and red seed bead earrings? I really love this pair of Christmas beaded dangle earrings, I can wear them in Christmas evening parties or any other occasions for this winter. If like DIY beaded dangling earrings, never miss this earring tutorial, just follow it to make some Christmas beaded earrings as gifts for your friends or family members. May you a wonderful weekend, see you next week~