Thursday, May 9, 2019

Learn from Beebeecraft How to Make a Metal Lace Pearl Necklace

Summary: This article will tell you how to make a simple pearl necklace. It’s easy for necklace lovers.
How to Make a Metal Lace Pearl Necklace-A Good Choice for Beginner
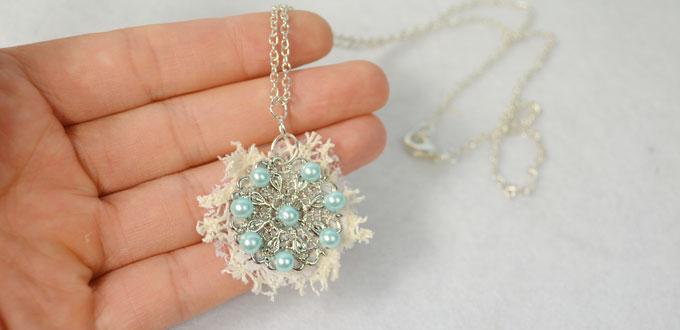
Do you want a metal pearl necklace to match your dress? This picture shows you a kind of simple white pearl necklace. You can make this pearl necklace at home according to our instructions. I have a ring, but the filigree flower fall, so I use the decoration to make this metal lace pearl necklace.

Jewelry craft supplies needed in the metal lace pearl necklace:

4mm Glass Pearl Beads
Brass Filigree Ring Bases
Flower Fabric Cord
Iron Jump Rings
Copper Jewelry Wire
Needle and Wires
Cross jewelry making Chain
Lobster Clasp
DIY Jewelry Tool Sets
Bent Nose Plier
Needle Nose Plier


Step1: Prepare the two main parts of the center

1st, attach a blue pearl bead to the middle of the filigree flower with copper wires;
2nd, shear 2 pieces of white lace ribbons and a piece of creamy white lace ribbon, and the size should be the same as the picture shows, then stitch the three ribbons together.


Step 2: Finish the center part of the necklace

1st, stitch the three ribbons behind the filigree flower;
2nd, add another 7 blue pearl beads around the filigree flower with copper wires, then hang 3 jump rings on the top side.


String a cross chain on the top jump ring and add a lobster clasp to the end the cross chain according to the pictures.

This is the final look of the metal lace pearl necklace:

Summer is on the way, this beautiful necklace is suit for your dress. Do you want to own one? Make one for yourself according to my instructions.
Beebeecraft DIY Woven Bracelet-How to Braid a Colorful Four Strand Bracelet

Summary: Do you like DIY woven bracelet? This Beebeecraft tutorial will show you how to braid a colorful four strand bracelet.If you like it, please vote for me!

The perfect combination of yellow cord, green cord, blue cord, red cord and the ring makes this woven bracelet eye-catching. DIY this braided bracelet is fun, easy and very inexpensive. In the following contents, we'll show you how to braid this four strand bracelet. Just keep reading.

Craft supplies for jewelry making the four strand bracelet:

Brass jewelry making Chain
Red Waxed Polyester Cord
Blue Waxed Polyester Cord
White string materials Nylon Thread
Silver Brass Cord Ends
Brass Magnetic Slide Lock Clasps
0.3mm Silver Copper Wire
Silver Aluminum Wire
Iron Jump Rings
Clear Plastic Stick
Needle Nose Plier
Diagonal Plier
Iron Scissor
Lighter

Instructions on how to make the four strand bracelet:

Step 1: Braid a green bracelet

1st, cut a piece of white nylon thread and a piece of green cord. Then, tie the two cords into a knot at one end;
2nd, cross the green cord over the left of the white nylon thread. Then, make a loop by crossing the green cord over the right of green cord and tighten the loop (as shown in the picture);
3rd, cross the green cord down the left of the white nylon thread. Then, make a loop by crossing the green cord over the right of green cord and tighten the loop (see the picture below);


4th, repeat the above braiding steps until you reach the desired length of your bracelet. Then, tie it off with a knot and cut off the excess strings (please leave a little bit on the end so that you can combine it with the brass cord end).


Step 2: Add brass cord ends and make three more bracelets

1st, combine the two ends of the green bracelet with silver brass cord ends using clear plastic stick;
2nd, repeat the above steps to make a yellow bracelet, a red bracelet and a blue bracelet.


Step 3: Wrap the jump ring

1st, take out an iron jump ring and wrap it with white nylon thread;
2nd, cut a piece of 0.3mm silver copper wire and wrap the white thread wrapped jump ring with the copper wire. Then, fix the copper wire within the middle of the ring (as shown in the picture);


3rd, combine the wrapped ring with a brass chain using copper wire.


Step 4: Combine the 4 woven bracelets with wrapped ring

1st, cross the red bracelet under the ring but above the copper wire in the middle(as shown in the picture);
2nd, repeat the above step to add the blue bracelet, the green bracelet and the yellow bracelet in sequence.


Step 5: Connect the two ends of the four strand bracelet

1st, select two brass magnetic slide lock clasps and combine them with three jump rings respectively;
2nd, combine the yellow bracelet with the slide lock clasp through the upper jump ring; combine the green bracelet and the blue bracelet with the slide lock clasp through the middle jump ring; combine the red bracelet with the slide lock clasp through the last jump ring(as shown in the picture);
3rd, repeat the above two steps to combine the other end of the four strand bracelet with slide lock clasp;
4th, connect the two ends together.


Here is the final look of the four strand woven bracelet.


If you enjoy DIY your own braided bracelet, making this woven bracelet will allow you to customize it to suit your own colors and textures in an affordable way. You don't need to drop hundreds of dollars on the latest bracelets-you just need some cords, some time and the above tutorial to make your own bracelet.

Beebeecraft Bead and Chain Jewelry - How to DIY a I love MOM Necklace

Summary: Here you will learn how to make an original necklace to give away to your mother on a special occasion,on Mother's Day. You might as well wear it yourself to prove what a proud daughter you are.

This beautiful piece of jewelry shows the “I love MOM” message to express your love for her. I have made the necklace in the pic for my own mom. I am very satisfied with the result and hope she loves it as much as I do. Let’s see the step-by-step instructions to DIY this necklace.

Jewelry craft supplies needed for the “I love MOM” necklace:

2 Square Rings
1 Heart Shaped Natural Lava Beads
Tibetan Bead Frames
Black Faceted crystal Glass Beads
Red Copper jewelry making Chain
Eyepin
Zinc Alloy Lobster Claw Clasps
Electroplate Glass Seed Beads
0.4 mm Copper wire
Flat Plier
Cutting Plier


Instructions on how to DIY a "I love MOM" Necklace

Step 1: Design the "M" letter inside the square rings

1st, lace the square ring in a way that the holes on the sides face up and down. Cut off about 12 cm of copper wire;
2nd, attach the wire to the left bottom part of the square ring;
3rd, then slide four glass beads onto the wire;
4the, pass the wire round the upper side of the ring and twist it in the bottom side.


5th, slide three beads and make a “V” shape;
6th, pass the wire around the upper right side of the ring;


7th, slide four glass beads and attach the wire twist it in the inner bottom right side, repeat the same process for the second square ring.


Step 2: Attach the two “M” square rings to the heart shape lava bead

1st, slide the eyepin through the square ring upper hole;
2nd, slide the beads onto the eyepin in the following order: two electroplate glass seed beads, the heart lava bead and another two electroplate glass seed bead;


3rd, attach the eyepin to the bottom hole of the upper square ring, as shown in the picture.


Step 3: Add the chain to finish the mother’s day necklace

1st, cut two 20 cm of chain. Attach the chains to the eyepin loop;
2nd, attach lobster claw clasps to the end of both two chains.


TADA! Here is the finished mohter's day gift:


Hope you enjoyed this tutorial. It is very easy to make it at home with very few items: if you do not have these particular items, you can use other beads.

Beebeecraft Christmas jewelry ideas- stocking pendant with beads

Summary: This article is about one of most impressive Christmas jewelry ideas-make Christmas stocking out of ordinary jewelry crystal glass beads. It can be really fun and challenging project when follow my instructions and diagram.
The art of making Christmas stocking pendant can be great joyful and entertaining for yourself and your family. Hanging some easy-to-carry festival pieces can enhance the Christmas atmosphere and increase the fun. Additionally, among lager amount Christmas jewelry ideas, the Christmas stocking can be just regard as the beginning of tradition Christmas Day.


Craft supplies for jewelry making Christmas stocking:
Swarovski Crystal glass Beads
Gemstone Beads
Nylon Wire
Side Cutting Plier
Instructions:


Step1: make the upper half portion of Christmas stocking
Make connected loops with four Swarovski Crystal Beads. Between each loop and layer, be careful of the shared beads. And what’s more, be careful of the beads’ color of each layer.
Step2: make the bottom half portions of Christmas stocking
In the step1, the below five beads are respectively marked: A, B, C, D and E. here, you can start with the bead A and then make connected beads with four Swarovski Crystal Beads according to G, H, I…N in the diagram. Finally connect the starting and ending to form loop F.
Step3: sew the loops in step2
For making Christmas stocking, you need to fold the side loops in groups of two, such as: H & F, I&N…
In the end, tie a knot firmly.
Step4: make the embellish front side of Christmas stocking
Take another strand of 20cm long wire, find the front side loops of your Christmas stocking; in center of Swarovski Crystal Bead loops, add on one white Gemstone stone by crossing wire through the beads.
Step5: design a hanger loop for your Christmas stocking pendant
Find the bead marked with alphabet “b” in step1, then connect the four Swarovski Crystal Beads with two ends and remember to fill one Seed Bead between each two Swarovski Crystal Beads. Finally, make a hanger loop with rest seed beads.
Step6: DIY your key chain.
Step7: ending work
Assemble the Christmas stocking pendant and finding chain, and you have done your Christmas stocking!
In the approaching Holiday season, for more Christmas jewelry ideas or other festival jewelry making guides, please just stay around and more fresh Christmas jewelry ideas may be launched soon.

Beebeecraft Christmas jewelry ideas-beaded Christmas hat

Summary: Christmas jewelry ideas-bead a delicate Christmas hat at home by some house-hold supplies. By using very fundamental skills, this decoration can be finished in ten minutes.
Instead of buying finished products from a department store, make handmade presents by using some house-hold supplies can be another great try by following the Christmas jewelry ideas, no matter simply some brief words explanation or concise beading diagram. Thus, in the following paragraphs, I will show you make a piece of loving beaded Christmas hat. Let’s start now.


Craft supplies for jewelry making Christmas hat:
4mm Glass Beads
Red Swarovski Crystal glass Beads (3mm & 4mm, 8mm)
12/0 Glass Seed Bead (green, red & golden)
Headpin
Jumpring
Clasp
Side Cutting Plier
Wire-Cutter Plier
Jewelry making tools Round Nose Plier
Instructions:
Step1: make out the skeleton of Christmas hat
According to the diagram, this portion can be divided into six layers. And in each layer, you should connect the starting and ending beads and reduce beads at same times for getting a cone hat shape (tips: in the diagram, the right side a bead is not really exist. It is just the same one on opposite left side).


Step2: decorate the semi-finished Christmas hat
Find out the central bead in layer2, and regard it as the beginning position of the decoration part. Then work with each end to bead like the number “8”; then pass then through its below Glass Beads respectively; finally, add on one Seed bead on each and cross both ends through one another seed bead.


Step3: complete the Christmas hat
Hold on a headpin and thread the branches in order of: 8mm round Swarovski Crystal Bead *1, semi-finished Christmas hat skeleton part and Glass Bead*1. Pull the 8mm bead in the Christmas hat and bent a loop with rest pin part.

Step4: design a pendant

You can freely hang on a clasp or other findings by using one Jumpring.
So far, your Christmas hat has done. Just wear yourself or give it to the beloved ones. Ultimately, if you need more sparkling Christmas jewelry ideas, welcome check out on our Beebeecraft.

Beebeecraft Christmas jewelry ideas-bead a lovely Christmas stick

Summary: In the Beebeecraft Christmas jewelry ideas, merely use one kind beads and one long headpin, make this lovely Christmas stick ornament to hang on your keys, bangs or further the necklace.
Actually, the Christmas stick spirit originally comes from the traditional candy cane associated with Christmas, in it, mainly adopt the red, green and white colors. Here, for making a beaded pendant one, I also maintain this tradition. Now, before proceeding to the Christmas jewelry ideas, take a look what you may need:


Jewelry craft Supplies and tools:
12/0 Glass Seed Beads (Golden & green)
8/0 Seed Bead (red, green & white)
Headpin
Jumpring
Clasp
Nylon Wire
Side Cutting Pliers
Jewelry making tools Wire-Cutter Plier
Round nose Plier

Instructions for Christmas stick:
Step1: prepare the bow decoration portion
For a Christmas stick, the most essential portion is the bow decoration. Firstly, snip a 30cm wire;

Then thread two Green 12/0 Glass Seed Beads onto its central position, moreover, cross both ends through one red 8/0 Seed Beads;
Thirdly, each end string five Golden 12/0 Glass Seed Beads and similarly cross through the red 8/0 Seed Beads;
Finally, add another three Golden 12/0 Glass Seed Beads and tie knots for a loop.


Step2: prepare the Christmas stick
Hold the headpin and add on the red and white 8/0 Seed Beads alternately. After getting its ideal length, curve the top pin part and bent a stick shape. Then assemble it with the bow decoration.


Step3: add on a clasp
Add on the clasp or other findings by two Jumprings.

Here, you have done the Christmas stick, and meanwhile the fundamental three Christmas jewelry ideas. Sincerely hope that you can love them and just enjoy yourself in the joyful day!

Beebeecraft Handmade Christmas ornaments star- beaded Christmas bell

Summary: This tutorial is free and fascinating; seriously speaking, once you figure out how a beaded Christmas bell is done, you will create many different kinds of beaded Christmas bells.
“Jingle bells, jingle bells, jingle all the way; Oh, what fun it is to ride; In a one horse open sleigh…” very familiar to your ears, yeah, the famous Christmas day is coming again! The festival atmosphere has occupied every corner of the world; you are still bearing the coldness and waiting outside the craft shops only to buy the commonly seen ornaments? Hey, guys, why not prepare some kind of handmade Christmas ornaments by yourself? It seems like an adventure, actually it is not as horrible as imagine! This time we would like to invite you to learn the beaded Christmas bell making.


Jewelry craft supplies for this handmade Christmas bell:
Jewelry string Nylon wire
Assorted crystal glass beads
Scissors
The instructions start here!
Step 1: prepare the beading string
Snip a piece of Nylon wire long enough for beading; so as per common estimation, fifty cm length is okay;
Step 2: make beaded Christmas bell


Slide four crystal glass beads onto right end of string, and cross the left end through first crystal bead we beaded just now; then continue sliding three crystal beads on right end and cross left end again through the last bead we just beaded; later slide beads as per the diagram shows at below:
Step 3: end the beaded Christmas bell
Make final knot at ends and cut the excess string.
So far, the Christmas bell is created! Now you must have mastered the necessary beading technique in this tutorial, we are looking forward to your novel ideas and stunning works; so hurry to take actions and make out more adorable handmade Christmas ornaments for your families and friends!

Beebeecraft Christmas garland earrings add more Christmas atmosphere for you

Summary: This is a good earring making tutorial for jewelry making beginners; first, the jewelry craft materials are easy to find and cost less; second, method is extremely simple; third, it is for Christmas, full of festival atmosphere!
It is a new beginning, as 2012 Christmas is coming; welcome this fresh and pleasing festival, meanwhile welcome you to our web circle and click the novel Christmas earrings idea; we would like to share all these interesting jewelry making tutorials with you, and we hope you can occasionally come here and also share your idea with us!


Before formally start the Christmas garland earrings, you need to prepare all things shown as below:
Assortment of glass seed beads
Silver bugle beads
Silver hoop earring settings
Beading string materials
Scissors
The instructions start now!
Step 1: prepare the “flowers” on Christmas garland
Snip a piece of beading string long enough for beading and wrapping, so the length is in accordance with your personal estimation;
Thread all your seed beads onto string, and the beads colors should be red and green in major roles; when threading seed beads, insert bugle beads equidistantly, making seed beads and bugle beads alternately appear.


Step 2: wrap the “flowers” onto hoop earrings
Actually, hoop earrings can be achieved also by handcrafts; but here, to save time and trouble, we use ready hoop earrings;
Fasten one end of beading string to earring hoop; wrap beaded string on hoop with the bugle beads as interval sections, which are shown in below picture:


Till all the “flowers” wrapped onto hoops snugly, your Christmas garland is done! Accurately, the Christmas garland earrings are created by you! Try it on, you know what, the Christmas bell is going to ring, take on your Christmas outfit and cute Christmas earrings, the celebration party is waiting for you!

Learn from Beebeecraft how to make lovely beaded Santa Claus

Summary: This is a crystal beaded Santa Claus, nice-looking, but not that complicated as you imagine; as per our neat diagram and detailed description, you can smoothly make out this lovely seed beads Santa Claus.
Winter comes and Christmas comes too; we all know in Christmas we are accustomed to using some lovely beaded Santa Claus charms to decorate our homes and trees. However, most of the charms are purchased from retail shops or online market; do you want to hand make some crystal beaded Santa Claus crafts to send out as unique gifts for friends and beloved ones; here we present you this chance!
Before formally start the project, you have to make the below things ready:
Seed beads( in red, blue, white, ivory and black colors)
Crystal glass beads
Nylon wire
Beading needle
Earring hooks
Scissors
The instructions start here now!

Step 1: string Santa Claus hat brim
Snip a piece of Nylon wire long enough for this exquisite beading work, and add a anchor bead to secure one end of the string with 2 cm tail; slide 11 blue seed beads on string and back through each bead with ladder stitch (as pic 1 shows); after one row, use brick stitch to start second row, and that will be the basic beading technique for beaded Santa Claus. When hat is finished, string the end up to the anchor bead position, make a firm knot with the other end there and trim off the anchor bead end.
Step 2: string the Santa Claus face
Add beads to stitch the following every row, and the beads number of every row will increase or decrease as per the relative design of this Santa Claus craft.
Step 3: complete the beaded Santa Claus
When whole project is beaded up, cut off the excess string, and attach this lovely Santa Claus craft with prepared ear hooks.
So your beaded Santa Claus earrings are successfully done! The Santa Claus crafts have more patterns than your imagination; so next time, we will present you more Santa Claus crafts and Christmas beaded jewelry.

Beebeecraft tutorials on Homemade beaded Christmas tree

Summary: Beaded Christmas trees are many jewelry makers’ favorite in the holiday season; we introduce you the illustrated way to finish this beautiful beading project.
This tutorial is also one important component of our Christmas beading series; here the beaded Christmas tree is another typical product representing the jubilant Christmas day! Cherishing the sincere affection and wish, you can make splendid beaded Christmas tree ornaments to your friends as unusual Christmas gifts.


What do you need to prepare before beaded Christmas tree tutorial begin?
Crystal seed beads in topaz, emerald, ruby and bronze colors
String materials fish string
Beading needle
Golden earring settings earwire
Large jump rings
Plier
Scissors
The instructions start here!


Step 1: prepare the “top star” on beaded Christmas tree
Snip fish string long enough, slide 5 topaz colored seed beads onto and tie off one end; then make the other end back through the whole 5 beads to form a loop; then thread the end though a new seed bead and an adjoining base bead we slide just now, and repeat the process until add 5 new beads around the loop (as pic shows);
Step 2: make the beaded Christmas tree
Slide 2 emerald seed beads and 1 ruby bead in order, making a loop emerald and ruby colors alternate; again back through the whole loop beads, however the slight difference is that this time just back through the emerald beads, skipping the ruby beads; pull the string end from right side and continue to make the other loops (as pic shows);
Step 3: finish the beaded Christmas tree
Make the beaded stand of Christmas tree, and cut off the excess string.
Now the beaded Christmas tree is done! Actually till this step, you just finish the project about how to make a beaded Christmas tree pendant; if you want it to be earrings, just loop hooks on ear wires and connect two by jump rings; the pretty earrings will be born in your hands.