Showing posts with label bead dangle earrings. Show all posts

Tuesday, August 6, 2019

Beebeecraft Tutorials on making a pair of seed beaded dangle earrings

Do you like a pair of beaded dangle earrings? Here I will show you how to make a pair of seed beaded dangle earrings.


To finish the jewelry making, you must prepare some materials. The a pair of seed beaded dangle earrings is made with some golden seed beads, white double holes seed beads,jewelry string and earrings hooks. It is quite easy for both green hands and professionals to make, so just follow the Beebeecraft Tutorials, and now let me show you HOW~

Jewelry craft supplies for making seed beaded earrings
Golden Seed beads
White Double Hole Seed Beads
Black Double Holes Seed Beads
Jewelry String
Jewelry Tool Supplies
Scissors


Instruction of making seed beaded earrings
Step1Finish the basic jewelry pattern
1st, cut a jewelry string and slide 4 golden seed beads, and slide a black double seed beads, then repeat the action 6 times and get a seed beaded with one loop;


2nd, make the string through another hole in a black bead,then slide 6 golden to the black seed bead;


3rd,repeat the action 6 times, and you will get one half basic jewelry pattern of one earring with golden and black seed beads;


Step2: Finish the earrings making
1st, change the black beads to white beads and use the same technique, you can get the other half of the earring with white and golden seed beads;

2nd, link two jewelry pattern of earring with seed beads by a open jump ring, and attach a open jump ring to the end of jewelry pattern then attach a earring hook to the one;

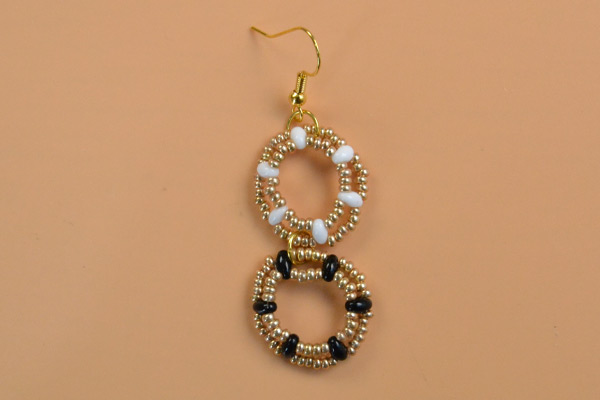
3rd, repeat all of the steps and you could get another earring;

Now this DIY glass bead bracelet is finished quickly, how do you like it? For me, I like seed beaded earrings so much that I will try to make another earrings with different color seed beads, and do you wanna join me and have a nice try?


Wednesday, July 24, 2019

Beebeecraft Tutorials on How to Make a Pair of Glass Beaded Square Drop Earrings

Today I going to show you how to make a pair of glass beaded square drop earrings. The detailed steps are listed below.


Bugle beads are frequently used in jewelry making, and they are popular because of their shaping functions. Today I chose black bugle bead, purple and transparent glass beads and gemstone bead to make this pair of glass beaded square drop earrings. Follow me to see how.

Jewelry craft supplies in making the glass beaded square drop earrings:

6mm Purple Faceted Crystal Glass Beads
4mm Transparent Crystal Glass Beads
12mm Red Gemstone Beads
25mm Black Bugle Beads
2mm Red Glass Seed Beads
Iron Headpins
10x15mm Black Glass Drop Beads
0.3mm Tiger Wire
Scissors
Round Nose Plier


Instructions on making the glass beaded square drop earrings:

Step 1: Make a square pattern

1st, cut a piece of 0.3mm tiger wire (about 70cm), thread it through 4 25mm black bugle beads and 3 4mm transparent glass beads alternatively, and then cross the wires through a 4mm transparent glass bead and tighten;
2nd, thread each wire through a black bugle bead and the transparent bead at the corner, then repeat this until you finish the second square pattern and tighten the wire.


Step 2: Add the last layer and transparent bead ornaments

1st, thread each wire through 2 4mm transparent glass beads and then thread through the black bugle bead respectively;
2nd, thread the wire through 2 transparent glass beads again respectively and then thread through the black bugle bead, finally tighten the wire.


Step 3: Add ornaments in the center of the square pattern

1st, combine the 2 wires, thread then through a 4mm transparent glass bead, then separate them by threading each wire through a 6mm purple glass bead and tighten up;
2nd, thread each wire through 3 purple bead and 3 red glass seed beads alternatively, and finally cross them through a purple glass bead and tighten up;
3rd, combine both wires and thread them through a 4mm transparent glass bead, then separate the wires by crossing them through the transparent glass bead in the corner of the square pattern and trim off the wire.


Step 4: Add a black glass drop dangle

1st, thread the headpin through a black glass drop bead, then twist a little loop in the end of the headpin;
2nd, hook the dangle to the bottom of the square pattern, then attach an earring hook on the top as shown.


Step 5: Add a bud for the purple glass ornament

1st, cut a short piece of tiger wire, then thread it through the 6mm purple glass bead;
2nd, thread both wires through a 12mm red gemstone bead, then cross the wires through the purple glass bead under it;
3rd, thread along the wires to make sure the bud is fixed and trim off the excessive wires in the end.


Time for the final look of this pair of beaded square drop earrings!

This pair of glass beaded square drop earrings has simple design, but unique personality. The colors red and black match perfectly, and the glass bead add bling element to highlight the charms. Its not difficult to make this pair of earrings, so have a try!

Thursday, July 18, 2019

Beebeecraft Tutorials on How to Make a Pair of Glass Beaded Cross Earrings

This Beebeecraft tutorial is about how to make a pair of glass beaded cross earrings. Follow the steps below and have a try.

This is a pair of earrings with beaded cross design. I pick some red and blue glass beads, plus some gold bead spacers to make them. As you can see from the picture, the supplies are simple. Now check my steps below to see how to make this pair of beaded cross earrings.


Jewelry craft supplies in making the glass beaded cross earrings:

6mm Red Faceted Crystal Glass Beads
6mm Blue Faceted Crystal Glass Beads
3mm Gold Bead Spacers
Long Nose Plier
Scissors


Instructions on making the glass beaded cross earrings:
Step1Bead a clover pattern

1st, snip off a piece of 0.38mm tiger wire (about 50cm), thread it through 5 3mm gold bead spacers and a 6mm red faceted glass bead;
2nd, thread the left wire through the red glass bead and tighten;
3rd, slide a red glass bead and 5 gold spacers to the right wire, then thread the wire through red glass bead you just slide;
4th, repeat this procedure and make 2 more patterns, and it finally ends up like what is shown in the picture.


Step 2: Add cross patterns

1st, slide 4 gold spacers, a 6mm blue faceted glass bead, a gold spacer and a blue glass bead in sequence to the right wire, then thread the wire through the 3rd and 4th gold spacer that you just added;
2nd, thread the wire through another gold spacer and then thread through the first gold spacer bead on the string and tighten;


3rd, thread the other wire through the gold spacers to the next stop as shown, then thread 4 gold spacers, a blue glass bead, a gold spacer and a blue glass bead again, then repeat the steps in above procedures to make the rest cross patterns.


Step 3: Add blue glass bead fringe ornaments

1st, thread the wire through the beads to the 2nd gold spacer on the cross pattern, then add a blue glass bead on the wire;
2nd, thread the wire through the top gold spacer on the next clover pattern, add a blue glass bead again and tighten;
3rd, thread the wire through the 2nd gold spacer on the next cross pattern, then add a blue glass bead and tighten;
4th, repeat above procedures to add rest blue glass bead ornament in sequence and finally trim off the extra wires.  


Step 4: Finish the glass beaded cross earrings

1st, attach a jump ring by threading it through the gold spacer on the top, then hook a silver earring hook with a plier;
2nd, repeat the whole process to make the other earing to make a set.

Show you the final look of my glass beaded cross earrings:

Do you love this beaded cross design? This pair of glass beaded earrings can be worn in any occasions. Of course you can use other color matching in making them. Have a pleasant try if you love them!

Wednesday, July 17, 2019

Beebeecraft Tutorials on Making a Pair of Sweet Earrings

his Beebeecraft tutorial will show you some special tips about how to make a pair of sweet earrings. Small and cute earrings are extraordinarily suitable for summer, and they are suitable for girls. As you known, pink gemstone beads is popular for making jewelry, especially earrings. This is because the gemstone beads are very textured and glamorous. Pink gemstone beads extremely make you shiny and playful.


Via making your own gemstone beaded earrings, you can create items that actually accord to your personal preference and add sparkles to any outfit as much as you’d rather to. Once you master the skills for major craft jewelry ideas, you can make them easily at home. What’s more, you can also wear them, give to friends as special gifts or even sell them.

Jewelry craft supplies needed to make the sweet earrings:
2mm Glass seed beads
18mm Iron Sliver Earring Hooks
0.2mm Thread Nylon Wire
Flat Nose Pliers
Cutting Pliers

How to Make the Sweet Earrings:
Step1: Secure beads in a wire
1st, slide a pink gemstone beads and a white seed bead in turn, and their number both three eventually;
2nd, slide three seeds bead between the two glass beads.


Step2: Finished the sweet earrings.
1st, slide a white seed bead between the pink beads;
2nd, connect the jump ring in a seed bead which is placed in the middle of the seed beads;
3rd, attach an earring hook to the jump ring.


The final look of the sweet earrings:

Wow! How beautiful and cute earrings. These tips are easily to learn and just spend your little time. Fellow the steps above and you can easily have a pair of sweet earrings made by yourself.

Monday, July 15, 2019

Beebeecraft Tips on How to Make a Pair of Bridal Chandelier Earrings with Pearl and Glass Beads

This is a bridal jewelry DIY project on making a pair of bridal pearl chandelier earrings. The detailed steps are listed below.


Are you searching for handmade bridal jewelry ideas? My tutorial is exactly what you want! With pearl beads and glass beads, I made a pair of elegant bridal chandelier earrings, which is a good choice for brides to wear on wedding day. Now follow my tutorial to see how to make the pearl drop earrings for wedding.

Supplies in making the pearl chandelier earrings with glass drop:

10mm White Glass Pearl Beads
6mm White  Glass Pearl Beads
4mm White Glass Pearl Beads
15x10mm Pearl Drop Beads
15x10mm Glass Drop Beads
8mm Transparent Glass Beads
3mm Gold Beads Spacers
2mm Yellow Bugle Beads
0.38mm Tiger Wire
Brass Rhinestone Beads Spacers
Tibetan Bead Cap


Step 1Make the starting part of the chandelier earring


1st, snip off a piece of tiger wire (about 50cm), then fold it in halves and tie a knot to the gold earring hook and tighten;
2nd, separate the 2 wires by sliding 7 2mm yellow bugle beads on each, and them cross the wires through a 10mm white pearl bead;
3rd, slide 6 gold bead spacers to one wire, and thread the wire through the 10mm white pearl bead again and tighten up.


Step 2: Make the main part of the chandelier earring

1st, slide a 15x10mm white pearl drop bead, a 2mm yellow bugle bead, a 4mm white pearl bead, a 2mm yellow bugle bead and a white pearl drop bead again in order;
2nd, cross and tie the wire to the joint between the 2nd and the 3rd gold spacers as shown;
3rd, slide a 2mm yellow bugle bead, a 4mm white pearl bead, a 2mm yellow bugle bead and a white pearl drop bead again, then cross and tie the wire to the joint between the 3rd and 4th gold spacer;
4th, repeat above pattern and finish the main part of the chandelier earring.


Step 3: Add out layer pearl ornaments

1st, thread the wire along the way to the 2nd yellow bugle bead on the left;
2nd, slide 2 2mm yellow bugle beads, a 6mm white pearl bead and 2 2mm bugle beads on the wire, and thread the wire through the next bugle bead on the primary layer and tighten;
3rd, thread the wire upward through along the drop pearl bead, the gold spacer and the next drop pearl bead again and then down to the bugle bead on the left;
4th, slide 2 2mm bugle beads, a 6mm white pearl and 2 yellow bugle beads again, and thread the wire through the next yellow bugle bead on the inner layer;
5th, repeat above beading pattern as for the right part, and finish the outer layer pearl ornaments.


Step 4: Add a glass drop for the chandelier earring
1st, when you finish the step 3, the wires are separated through the 2nd and 3rd pearl bead, then slide 9 yellow bugle beads to each wire, and cross both wires through a gold bead spacer;
2nd, add a 6mm white pearl, a brass rhinestone spacer, a gold Tibetan bead cap, a 8mm glass bead, a gold spacer, a 15x10mm glass drop bead and finally a yellow bugle bead respectively;
3rd, tighten up the wire and trim off it to finish the pearl chandelier earring with glass drop.

Time for the final look! They are extremely elegant!


I finish this pair of bridal chandelier earrings within half an hour and I believe that you can also finish them in a short time by following the steps I listed. If you happen to be a bride-to-be, or if you have friend who is a bride-to-be, then it is highly suggested to make this pair as gift for yourself or your friends!