Wednesday, May 25, 2016

Elegant Two-strand Flower Pearl Beads Necklace

Do you love beading necklace? I’ve brought so many beading necklaces to you all, and today, I will show you a two-strand necklace. This is a pearl beads necklace with 2 beaded flowers, and I think you will like it after seeing the flower beaded necklace. OK, let’s see it together now~

Supplies you’ll need in making the elegant pearl necklace:
8mm White Pearl Beads
6mm White Pearl Beads
White Felt  
Tibetan Style Toggle & Tbar
Orange Drop Jade Beads
0.2mm Transparent Fishing Wire
0.3mm Golden Jewelry Wire  
Needle
Glue Gun 
Iron Scissor
Step 1: Cut a piece of 0.3mm jewelry wire, slide 5 orange drop jade beads to it, cross one end of the wire through the last bead to form a bead flower, and wrap the wire to fix the flower. 

Step 2: Cut a piece of jewelry wire again, slide a drop glass bead to it, and then wrap the wires to fix the bead. Continue to add other 4 glass beads and wrap them together as a flower, then glue an 8mm pearl bead on center of this bead flower, and glue this bead flower with the orange flower as pictured.
Step 3: Cut a piece of fishing wire, and tie it to a Tbar. Slide enough 6mm pearl beads to it. Cut a piece of white felt and paste it on back of the orange flower, and then add this flower to the pearl strand. Slide several 6mm pearl beads to the fishing wire and then add another orange flower to the wire, then continue to add more pearl beads to the wire till the end, and then tie the wire to a toggle as pictured.
Step 4: Make another pearl strand with fishing wire and tie it to the toggle and Tbar as pictured.
Done!

Now, this pearl beads necklace is finished quickly, do you like it? There are some other beading necklaces on Pandahall, if you also interested in DIY, just try to make one yourself!

A Jewelry Of Your Choice


 We all love to wear jewelry. How wonderful would it be if we can wear a different type of jewelry every day? Would it not be nice to wear jewelry that not only matches our clothes, but also is in sync with the style and colour of our outfit? Well it sounds wonderful, doesn’t it? This is now possible due to the presence of aluminum wire . It is one of the most advanced types of jewelry in recent time. It is the new way of wearing jewelry. It is not only modern but also offers good value for money. The  jewelry made up of aluminum wire is a type of jewelry whereby you have to put little efforts to wear it. It is almost like you create a new jewelry yourself. 


Aluminum wire jewelry in fashion

What is the reason for aluminum wire  jewelry for being so famous? The first reason is that it is a very innovative and unique concept. It is also a reasonably new way of wearing jewelry. Secondly, it is very easy on the pocket as well. It may not compare to fine jewelry but it definitely ranks very highly in everyday jewelry wear. One can have a new jewelry to wear according to the dress they want. Moreover, they are very easily available everywhere- through your local market and also through online.   


Availability of the jewelry

These aluminum wire jewelry are available in a variety of designs, co lours, shapes and types.. The most unique feature of this type of jewelry is that they are available in an array of materials like glass, metal, acrylic etc. It is up to the wearer to choose the type of aluminum wire jewelry that they would like to wear.You can co-ordinate your dress . 

are many advantages of wearing  jewelry. The foremost advantage being that it allows the wearer to create a new jewelry for them every time. It allows you to create your own style. Further, you do not need a lot of space to store a lot of jewelry. You can have just a jewelry of your choice in order to give yourself a different look. 

Today this kind of jewelry has a great demand in the market. People like to wear it as it is very trendy and light in weight. You can always order the jewelry online where there are lot of choices from where you can get the one you want.

Thursday, May 19, 2016

DIY Simple Multiple Strand Ethnic Beading Bracelet

Hey, friends! Happy to see you again. Next I wanna bring you a simple beaded bracelet. This is a Tibetan style multiple strand bracelet and if you are a beading jewelry lover, then you should see this one. Just let’s see the ethnic bracelet together~

Supplies you’ll need in making the DIY beaded bracelet:
8mm Purple Faceted Glass Beads
8mm Brown Wooden Beads
3mm Purple Seed Beads
Tibetan Style Bead Caps
Tibetan Style Toggle Claps
Tibetan Style Bead Spacers
8mm Colorful Frosted Acrylic Beads
11x6mm Rhinestone Beads
0.2mm Transparent Fishing Wire
Scissors

Step 1: Cut a piece of fishing wire, attach a toggle clasp to it and thread a brown wooden bead, a bead cap and a rhinestone bead to the wire. Add enough bead spacers and 8mm purple glass beads alternatively to the wire, and next add a rhinestone bead, a bead cap and a brown wooden bead to the wire, then attach the other part of the toggle clasp to the other end of the wire.
Step 2: Tie another piece of fishing wire to the toggle clasp, add a bead spacer and enough blue frosted acrylic beads, then a rhinestone bead to it, and tie the other end of the wire with the other toggle clasp.
Step 3: Add another fishing wire with blue sees beads to the toggle clasps.
Step 4: Add a fishing wire with orange frosted acrylic beads and a fishing wire with enough purple glass beads and bead spacers to the toggle clasps.
Done!
Hey, this beading bracelet is finished quickly. How do you think of it? This ethnic bracelet needs no more professional skills in making it, so you can also DIY beaded bracelet at home like this one. Hope you like it and have a nice day! 


Attached is our coupon code, use coupon code MayBLOGEN10OFF for 10% off for your orders, valid time from May 18 to May 31.


Wednesday, May 11, 2016

DIY Handmade Chain Bracelet with Green Charms

Hey, are you searching beautiful DIY charm bracelets? If yes, then I must say you are so lucky for here I will share a green charm bracelet with you. This chain bracelet with charms is really easy to make yet it is quite fresh to wear in hot summer. Follow me to see this chain charm bracelet together.
Supplies you’ll need in making this handmade charm bracelet:
4mm Golden Spacer Beads 
10mm Green Glass Beads  
2mm Green Seed Beads
10mm Black Hematite Beads 
Golden Jump Rings
Golden Twisted Chain 
Golden Headpins  
0.3mm Tiger Tail
Tibetan Style Toggle
Needle Nose Plier
Round Nose Plier
Diagonal Plier 
Step 1: Cut a piece of tiger tail, adding a 10mm black hematite bead and 8 2mm green seed beads to it, then cross the tiger tail through the hematite bead.
Step 2: Slide 8 2mm seed beads to tiger tail and cross it through the hematite bead and 2 seed beads beside it.

Step 3: Slide a golden spacer bead to a tiger tail, then cross it through the 3rd seed bead and add another spacer bead. Repeat this step to add other 5 spacer beads as pictured and make other 3 bead patterns like this one.
Step 4: Prepare a piece of golden twisted chain, add the Tibetan style toggle to the 2 ends of it with jump rings. Attach all the 4 bead patterns to the chain with jump rings.
Step 5: Slide a 2mm green seed bead and a 10mm glass bead to a headpin, making a loop at the end. Repeat to make other 4 such patterns. Attach all the 5 headpin to the chain as pictured.

Done!
How do you think of this green charm bracelet, friends? If you also like DIY charm bracelets, just try to make this one. I think you will love DIY then.

Thursday, May 5, 2016

Easy Handmade Felt Mushroom DIY

Hey, do you like easy felt crafts? Here I will show you a felt mushroom, and you can follow this instruction to make it later. You can also make this handmade mushroom with your little kids, and I think he will love it really.
Jewelry making supplies you’ll need in making mushroom:
3mm Golden Seed Beads
Red, White and Green Felt
Needle
Cotton Threads
Scissors

Glue Gun
Step 1: Tailor 2 pieces of felt shapes like below with red and white felt, and sew some golden seed beads on the white felt with needle and cotton thread (You can draw the outline on the white felt ahead). Sew some golden seed beads on the red felt as pictured, then tailor some white felt and glue them on the red felt.
Step 2: Tailor a grass shape with green felt and glue it with the mushroom. Tailor other parts with white and red felt and glue them with the mushroom together as pictured.
Done!
Wow, how beautiful the handmade mushroom is! If you also like DIY cute ornaments, I think this felt mushroom is a good choice for you. You can glue this handmade mushroom on the door or somewhere else, I think this vivid easy felt craft will make your house more sweet! 

Wednesday, April 27, 2016

DIY Handmade Pandora Beads Hoop Earrings

Hey, dear readers! Wanna make handmade beads earrings at home? Here I will share a pair of handmade hoop earrings with you all, and it is quite easy for both professionals and green hands to make. Hope you will like and make the DIY beads earrings then.
 Supplies you’ll need in making the Pandora beads jewelry:
11mm Alloy Rhinestone European Beads
6mm Tibetan Style Bead Spacers
6mm Brass Rhinestone Beads
14mm Glass European Beads
Iron Earring Hoop
Step 1: Prepare an earring hoop, a 14mm red European bead, 2 11mm rhinestone European beads, 2 6mm Tibetan style spacer beads and 2 6mm brass rhinestone beads. Slide all these beads to the earring hoop as alternatively as pictured. Repeat to make the other earring to make a pair.
Done! I choose other different colors Pandora beads to make the other pair earrings as well, how do you think of them?
Do you like the Pandora beads earrings? It is so easy to make such kinds of Pandora beads jewelry, so if you are also interested in making the handmade hoop earrings, just try to make yourself. Anyway, hope you have a nice day!

Thursday, April 21, 2016

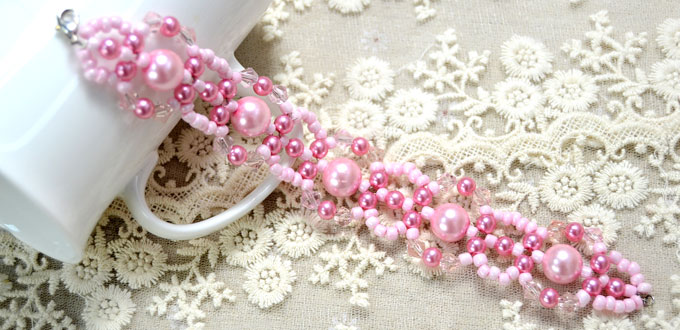
DIY Handmade Pink Beaded Bracelet with Seed Beads and Pearl Beads

Are you searching for beading bracelet for spring? If yes, you are so lucky for here I will share a pink beaded bracelet with you guys. This handmade pearl bracelet is so cute and I can bet you will like it after seeing it. Well, just follow me to have a look~
Supplies you’ll need in making the DIY beaded bracelet:
12mm Glass Pearl Beads
6mm Glass Pearl Beads
6mm Bicone Glass Beads
4mm Round Seed Beads
Lobster Clasp
0.38mm Tiger Tail Wire
Wire Cutter Pliers
Side Cutting Pliers
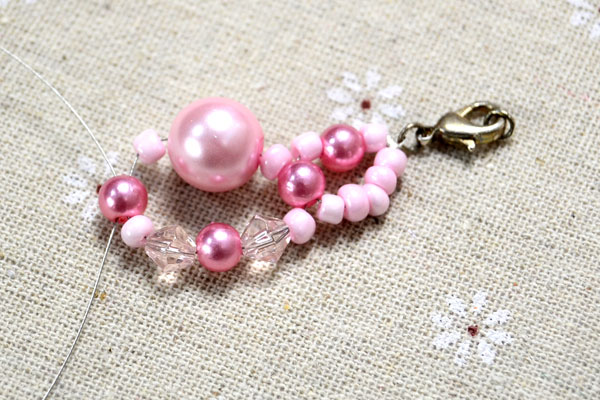
Step 1: Cut a piece of 0.38mm tiger tail (with a length about 120cm). Attach a lobster clasp to the middle of the wire with a jump ring.
Step 2: Slide a 4mm pink seed bead, a 6mm pink pearl bead, a 4mm pink seed bead and a 5mm pink pearl bead to one wire, while slide 5 4mm pink seed beads to the other wire, and cross this wire through the 6mm pink pearl bead as pictured.
Step 3: Slide 2 4mm pink seed beads, 2 6mm bicone glass beads and 2 6mm pearl beads crossly to one wire, while slide 2 4mm pink seed bead, a 12mm pearl bead and a 4mm pink seed bead to the other wire, and cross this wire through the pink pearl bead.
Step 4: Repeat step 2 and step 3 to make more bead patterns until the length of the bracelet is fit to you.
Step 5: Slide a crimp bead and a jump ring to the 2 wires, cross the wires through the crimp bead and pinch the bead into flat to fix the wire.
Step 6: Slide 5 4mm pink seed beads and a 6mm pearl bead to one wire, cross the other wire through along the beads in middle part of the bracelet, and cross this wire through the 6mm pearl bead.
Step 7: cross the wire at left side through along the beads in middle part, and slide 2 4mm seed beads, 2 6mm bicone glass beads and 2 5mm pearl beads on the other wire crossly as pictured. Cross the other wire through the pearl bead.
Step 8: Repeat step 7 to make other more bead patterns as the right side of the bracelet, just like the left side.
Step 9: After finish the last bead pattern, tie the wire with the bracelet and cut off the excess wire.
Done~
Wow, such a seed beaded bracelet is finished now~ How do you think this pink beaded bracelet? I love it so much and I can’t wait to make one for myself. If you also like this handmade pearl bracelet, just try to make it at home! Hope to see your work~