Showing posts with label beaded bracelet. Show all posts

Tuesday, July 9, 2019

Beebeecraft Tutorials on How to Make a Beaded Flower Bracelet

Most of you love flower bead bracelet patterns. This tutorial from Beebeecraft tutorials is about making a beaded flower bracelet with glass beads, pearl beads and bugle seed beads. Steps are explained below.


We have made much attempt in combination glass beads and pearl beads in jewelry making. Today I made this flower bead bracelet pattern with glass beads, bugle seed beads and white pearl beads. The color of the whole bead bracelet design is light and pure, which makes people release and peaceful when watching it. Now let’s see how to make the beaded flower bracelet.


Jewelry craft supplies needed in making the beaded flower bracelet:

6MM Transparent Crystal Glass Beads
2mm Glass Bugle Beads
Gold Ending Clasp
Long Nose Plier
Scissors


Instructions on making the beaded flower bracelet:

Step 1: Bead a flower pattern

1st, snip of a piece of tiger wire about 20cm, slide 4 2mm bugle beads and cross the ends through another bugle beads and tighten;
2nd, slide a 6mm transparent glass bead, a bugle bead, a 6mm pearl bead, a bugle bead and finally a 6mm transparent glass bead in order;
3rd, Cross the bugle bead ring and thread the wire backward through the last transparent glass bead you just slide;
4th, slide a bugle bead, a pearl bead, a bugle bead and a glass bead to the wire and cross the bugle ring and wrap the wire back through the transparent bead you slid at last;
5th, repeat the 3rd and 4th procedure to make the rest 3 petals and finish the flower. Make 3 more beaded flowers in the same way.


Step 2: Make the main part of the bracelet

1st, snip off 2 pieces of 40cm tiger wire, and then fix a beaded flower to the wires with one wire thread through a pearl bead on the top and the other wire through the pearl bead on the bottom;
2nd, slide a bugle bead, a transparent bead and a bugle bead to each wire, and add another flower pattern in the same way;
3rd, repeat the process in above procedure and add the rest flower patterns as shown in the picture.


Step 3: Make the rest part of the bracelet


1st, slide 5 bugle beads, a glass bead, a pearl bead and a glass bead to each of the wire, and then cross the wires through a bugle bead;
2nd, slide a glass bead, a pearl bead and a glass bead again to each wire, and cross both wires through another bugle bead and tighten.


Step 4: Finish the beaded flower bracelet

1st, slide a gold bead spacer to each wire, trim off the extra wire and attach the ending clasps;
2nd, add the toggle clasp and ultimately finish the whole beaded flower bracelet.


Look at the final piece on my wrist! It’s very bling bling and elegant!


This beaded flower bracelet design is a successful combination of the glass beads and the pearl beads. As you can see from the picture, it is shinny on hand but at the same time it shows an elegant temperament. This beaded flower pattern is not fresh since we have made several jewelry designs which apply this beaded flower pattern. Anyway, it is still a suggested DIY project for both green hands and DIY jewelry lovers. Have a nice try!


Monday, July 8, 2019

Beebeecraft Tutorial on How to Make a Jump Ring Bracelet with Pearl Dangles

Do you like jump ring bracelets? In today’s DIY project, Beebeecraft tutorials will introduce how to make a jump ring bracelet with pearl dangles in the article below.


I believe that you are very familiar with jump rings in jewelry making. Jewelry makers had created many jump ring bracelet patterns, but today I will share with you an elegant jump ring bracelet with pearl dangles. Now follow me to learn how to make the jump ring bracelet!


Craft supplies for jewelry making the jump ring bracelet with pearl dangles:

8mm Jump Rings
4mm Jump Rings
Headpins
Long Nose Plier
Round Nose Plier
Side Cutting Plier


Instructions in making the jump ring bracelet with pearl dangles:

Step 1: Twist a clasp

1st, snip off a short aluminum wire (about 30cm), and make a tiny loop at both ends;
2nd, twist the wire into “S” shape as shown in the picture.


Step 2: Connect the jump rings  

1st, prepare 2 10mm jump rings, enough 8mm jump rings and 4 mm jump rings;
2nd, hook a 10mm jump ring to the clasp, add 2 4mm jump rings and another 2 4mm jump rings and make them connected to each other;
3rd, take 2 8mm jump rings this time, and connect them to the jump ring chain, add 4 4mm jump rings, 2 8mm jump rings, 2 4mm jump rings and 2 4mm jump rings in sequences.


Step 3: Finish the jump ring bracelet pattern

1st, repeat the jump ring pattern in above step and attach a 10mm jump ring when you reach the length that fits your wrist;
2nd, hook the jump ring to the clasp and finish the pattern.


Step 4: Add pearl dangles

1st, prepare 15 headpins and 15 pearl beads, and thread a pearl bead to a headpin respectively, and make a loop at each end of the headpin;
2nd, divide the pearls into 5 sets, 3 pearls into a set and then hook each set to the 4mm jump rings one by one in proper place as shown in the picture.


Have a look at the final piece of my jump ring bracelet with pearl dangles. It's so elegant!
Jump rings are very cheap among jewelry making components, thus it would not cost you much money to make a jump ring bracelet. I add some pearl dangles to make this bracelet elegant. You can change the pearl beads to other beads as you like. Just get a try. 

Wednesday, April 10, 2019

How to Make Crystal Spring Bracelet

Beautiful crystal spring bracelet made by three kinds of beads is very fair and excellent for the coming season. The green-blue color is just like the feel of spring, full of vigor and hope. I think it is a good gift for the coming Easter. Now i will teach you how to make it.
 
The materials you may need:
Two Tone Crackle Glass Beads Strands
50pcs/Strand Imitation #5301 Bicone Beads
Brass Jump Rings
Silver Tone Alloy Lobster Claw Clasps for DIY Metal Jewelry
Glass Seed Beads
Ransparent Fishing Thread Nylon Wire
Jewelry Pliers
Stainless-Steel Scissors

Main steps in this jewelry making:
1. Thread seven white glass seed beads and put the wire crossed in one bead.
2. Thread one crackle glass bead and one imitation bead as the picture shows.
3. Repeat the steps to thread the other beads. The key is to cross the wire in every node so that the spiral effect can come out.
4. Add the jump rings in both points of the bracelet, then thread the lobster claw clasp.
When you finished all the steps, you will certainly get a beautiful bracelet. The white seed beads interspersed in the green-blue beads present the effect of spiral line. If you buy a large number of materials at one time, you will get some discount.And the April promotion is going on, you can get many products on sale. That is fabulous!

Monday, April 1, 2019

Jewelry Making of Blue Pearl Bracelet

Many seed beads are used in making this bracelet. The bright colors show symbolize youth and energy. Young girls will like it a lot.


Materials needed before jewelry making:
4mm About 1000Pcs Glass Pearl Beads DeepSkyBlue Tiny Satin Luster Loose Round Beads in One Box for Jewelry Making, DeepSkyBlue;
MGB® Glass Beads, Japanese Seed Beads, 11/0 Round Glass Seed Beads, White;
Iron Twisted Chains Curb Chains, Silver Color;
925 Sterling Silver Lobster Claw Clasps, Carved 925, Platinum;
Transparent wires;
Tools:
Needles;
Scissors;


Main steps of this jewelry making:
1. Thread four white glass seed beads with the wires.
2. Thread four glass pearl beads with the same wire.
3. Thread another four white seed beads between each blue beads.
4. Thread the other beads in the same way.
5. Add the twisted chains and lobster claw clasps.


Do you like this kind of bracelet? If you have any other suggestion, welcome to tell us. You can leave your comment below so that i can get your thought.

Wednesday, May 11, 2016

DIY Handmade Chain Bracelet with Green Charms

Hey, are you searching beautiful DIY charm bracelets? If yes, then I must say you are so lucky for here I will share a green charm bracelet with you. This chain bracelet with charms is really easy to make yet it is quite fresh to wear in hot summer. Follow me to see this chain charm bracelet together.
Supplies you’ll need in making this handmade charm bracelet:
4mm Golden Spacer Beads 
10mm Green Glass Beads  
2mm Green Seed Beads
10mm Black Hematite Beads 
Golden Jump Rings
Golden Twisted Chain 
Golden Headpins  
0.3mm Tiger Tail
Tibetan Style Toggle
Needle Nose Plier
Round Nose Plier
Diagonal Plier 
Step 1: Cut a piece of tiger tail, adding a 10mm black hematite bead and 8 2mm green seed beads to it, then cross the tiger tail through the hematite bead.
Step 2: Slide 8 2mm seed beads to tiger tail and cross it through the hematite bead and 2 seed beads beside it.

Step 3: Slide a golden spacer bead to a tiger tail, then cross it through the 3rd seed bead and add another spacer bead. Repeat this step to add other 5 spacer beads as pictured and make other 3 bead patterns like this one.
Step 4: Prepare a piece of golden twisted chain, add the Tibetan style toggle to the 2 ends of it with jump rings. Attach all the 4 bead patterns to the chain with jump rings.
Step 5: Slide a 2mm green seed bead and a 10mm glass bead to a headpin, making a loop at the end. Repeat to make other 4 such patterns. Attach all the 5 headpin to the chain as pictured.

Done!
How do you think of this green charm bracelet, friends? If you also like DIY charm bracelets, just try to make this one. I think you will love DIY then.

Thursday, April 21, 2016

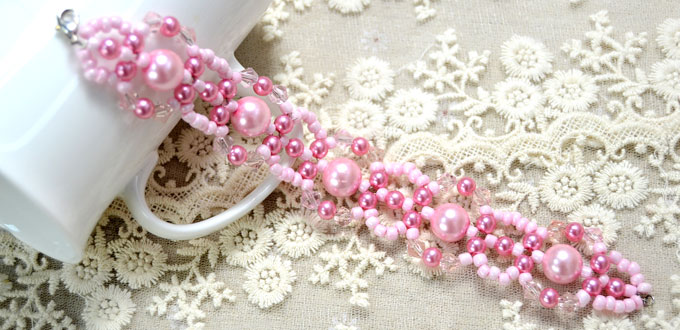
DIY Handmade Pink Beaded Bracelet with Seed Beads and Pearl Beads

Are you searching for beading bracelet for spring? If yes, you are so lucky for here I will share a pink beaded bracelet with you guys. This handmade pearl bracelet is so cute and I can bet you will like it after seeing it. Well, just follow me to have a look~
Supplies you’ll need in making the DIY beaded bracelet:
12mm Glass Pearl Beads
6mm Glass Pearl Beads
6mm Bicone Glass Beads
4mm Round Seed Beads
Lobster Clasp
0.38mm Tiger Tail Wire
Wire Cutter Pliers
Side Cutting Pliers
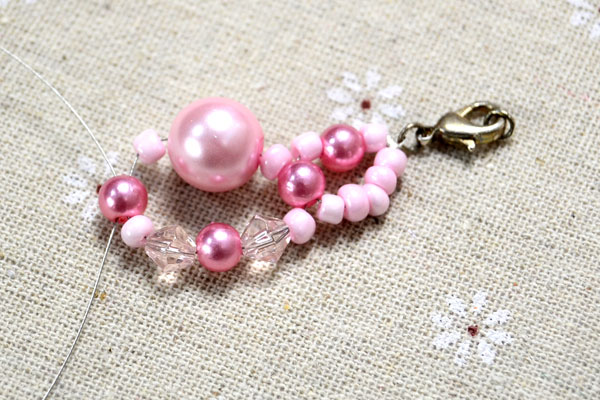
Step 1: Cut a piece of 0.38mm tiger tail (with a length about 120cm). Attach a lobster clasp to the middle of the wire with a jump ring.
Step 2: Slide a 4mm pink seed bead, a 6mm pink pearl bead, a 4mm pink seed bead and a 5mm pink pearl bead to one wire, while slide 5 4mm pink seed beads to the other wire, and cross this wire through the 6mm pink pearl bead as pictured.
Step 3: Slide 2 4mm pink seed beads, 2 6mm bicone glass beads and 2 6mm pearl beads crossly to one wire, while slide 2 4mm pink seed bead, a 12mm pearl bead and a 4mm pink seed bead to the other wire, and cross this wire through the pink pearl bead.
Step 4: Repeat step 2 and step 3 to make more bead patterns until the length of the bracelet is fit to you.
Step 5: Slide a crimp bead and a jump ring to the 2 wires, cross the wires through the crimp bead and pinch the bead into flat to fix the wire.
Step 6: Slide 5 4mm pink seed beads and a 6mm pearl bead to one wire, cross the other wire through along the beads in middle part of the bracelet, and cross this wire through the 6mm pearl bead.
Step 7: cross the wire at left side through along the beads in middle part, and slide 2 4mm seed beads, 2 6mm bicone glass beads and 2 5mm pearl beads on the other wire crossly as pictured. Cross the other wire through the pearl bead.
Step 8: Repeat step 7 to make other more bead patterns as the right side of the bracelet, just like the left side.
Step 9: After finish the last bead pattern, tie the wire with the bracelet and cut off the excess wire.
Done~
Wow, such a seed beaded bracelet is finished now~ How do you think this pink beaded bracelet? I love it so much and I can’t wait to make one for myself. If you also like this handmade pearl bracelet, just try to make it at home! Hope to see your work~